
Today I will explain steps of lighting design calculations by using Calculux Indoor Software as follows.
First Step: Checking the default settings of Calculux
You should know the following facts:
- Before you start 'your first Project’ after installation of Calculux software, you should check the default settings of Calculux.
- By means of default settings you can specify parameters that affect all future projects (new defined luminaires, luminaire arrangements, calculations and/or reports, etc.).
- The default settings remain valid the next time Calculux is started and can be changed at any time.
- If you specify/set the most common used parameters, you eliminate the need to specify/set the same parameters every time you create a new project.
- The default settings can be entered by means of the Option menu and are saved in the configuration file of Calculux.
- Do not use the Option menu when you want use different parameters for one particular project only.
Default Settings to Be Checked:
For 'First Project' you are going to check the following default settings:
- Environment (in options menu) (default settings concerning the program environment),
- Report Setup Defaults (default settings concerning the contents and layout of the report),
- Calculation Presentation Defaults (default settings concerning the Calculation Presentation).
1- Environment
A- Select Environment from the Options menu.

B- Select the Directories tab.

- Check the directory settings of the Project files, Phillum files and Vignette files.
Notes:
- (Project directory contains the saved projects done bu the users),
- (phillum directory contains the photometric data for luminaires, the programs come with few numbers of phillum files),
- (Vignette directory contains information about users , the company names and addresses).
C- Select the Database tab.

- Check the directory settings of the Database files. (you must install the data base files to see its directory).
D- Select the general tab,

- Check box for confirmation on critical operations.
- Don’t check box for inverse maintenance factor (MF is less than or equal to 1 but in some countries the inverse MF is used which is more than or equal to 1).
E- Click OK to return to the Main View.
Note:
- The Environment Options only have to be set after installing Calculux.
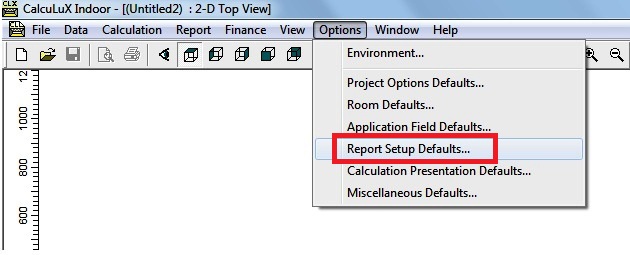
2- Report Setup Defaults
A- Select Report Setup Defaults from the Options menu or from the Report menu choose setup.

B- Select the Contents tab.

- In the Included box, select the chapters to be included in the report by selecting them from the excluded section and add them to the included section, you can do the reverse to exclude an included item.
- In the Presentation Forms box, select the presentation forms of the calculation presentation result views.
- Select Textual Table, Iso Contour,Filled Iso Contour
C- Select the Layout tab.

C.1 In the Project Luminaire Information box,
- select in which way the luminaire luminous intensity information is to be shown.
- Select Show Polar Diagram.
C.2 In the Installation Data box,
- select which elements are to be displayed in chapter 'Installation Data' of the report.
- Select Show Aiming Angles.
C.3 In the rotate for presentation box,
- select the report layout printing orientation to be portrait printing or landscape printing. You can do the same from the report menu choose print setup and choose portrait or landscape printing.


- Select portrait printing.
C.4 In the General box,
- select which additional information is to be displayed on the report like:
- Page number,
- File name.
- Make Selections for the following:
- Date format,
- Language of report.
D- Click OK to return to the Main View.
3- Calculation Presentation Defaults
3- Calculation Presentation Defaults
A- Select Calculation Presentation Defaults from the Options menu.

B- Select the Presentation Forms tab.

- In this tab you can select the elements to be displayed in the calculation presentation result views.
- Select Textual Table, Iso Contour, Filled Iso Contour
C- Select the General tab.

C.1 In the Show box,
- Select the elements to be displayed by default in the calculation presentation and report.
- Select Luminaires, Luminaire Code, Luminaire Legend, Drawings,Fill Color Legend, Room,Connected Field,Connected Grid
C.2 In the Iso Contour Method box,
- Select which Iso Contour Method will be used by default for the calculation presentation.
- Select Relative
D- Select the Scaling tab.

D.1 In the Minimum Report Scale box,
- Select 10
D.2 In the Sizing box,
- Select the default sizing of the calculation presentation result views,
- select: Zoomed Relative to Grid & Factor 1.000
Note:
- By setting the above scaling, the size of the defined objects in the calculation presentation result overviews will be based on the size of the grid and the field. The size is determined by the 'Zoom Factor'.
E- In the quality figures tab,

- You can show the following quality figures:
- Average value,
- Minimum,
- Maximum,
- Minimum/ Maximum,
- Minimum / average.
- Choose Average value, Minimum/ Maximum and Minimum / average.
F- Click OK to return to the Main View
By doing the above steps, you finish the process of adjusting default settings of Calculux.
In the next article, I will explain Complete examples for a projects designed by Calculux Indoor. Please, keep following.

i want to ask you eng. ali , is this the best defaults so that when i download calculux and install it i change its default to this ?
ReplyDeleteyes, of course, these is the best defaults when you start using the program for the first time. but you can change it according to the actual conditions of your project.
Delete